-
Feature
-
Interface
-
File Operation
-
Design Central
-
Basic Setting
-
Viewing Tools
-
Object Operation
-
Drawing
-
Parametric
-
Graph Editing
-
Graph Transform
- Move
- rotate
- Transform Again
- Mirror
- Arc and Line Fit
- Envelop Distortion
- Perspective Distortion
- Push and Pull Distortion
- Twist Distortion
- Shadow Distortion
- Curve Zmap
- Auto Nesting
- Interactive Nesting
- Clone Along a Curve
- Rectangular Clone&Polar Clone
- Clone along a Line
- Clone along an Arc
- Clone along a Spiral
- Scale 2 Points
- Orient 2 lines
- 3D Move
- 3D Rotate
- 3D Scale
- 3D To XY Plane
-
Image Processing
-
Text Editing
-
Node Editing
-
Graph Toolpath
- Tool Path
- Profile Machining
- Area Clearance
- Flute Machining
- 3D Corner Engraving
- Midine Machining
- Drilling
- Insert And Inlay
- Intelligent Machining
- Prism Machining
- Embossing Machining
- Toolpath output
- Tool Management
- Toolpath Walk Simulation
- Toolpath Shaded Simulation
- Post Set
- Toolpath Regenerate
- Toolpath Stat
- Chamfer Machining
- Adaptive Area Clearance
-
Image Toolpath
-
Wireframe Toolpath
-
Toolpath Edit
-
Waveboard
-
Mesh
-
Relief Sculpt
-
Surface
- Surface
- Import Surface File
- Standard Surface
- Freeform Surface
- Chamfer Surface
- Fillet Surface
- Extend Surface
- Show Effect
- To 3D Curve
- Curve Project to Surface
- Pullback
- Extract Edge
- Split at Isocurve
- Trim at Curve
- Trim at Surface
- Untrim
- To Mesh
- Edit Node of Surface
- Insert Control Point
- Vari Fillet Surfaces
- 3D-Spline
- Surface Flatten
- Mesh Wrap
-
Canvas 3D
-
Surface Toolpath
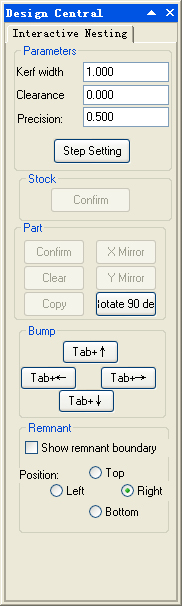
Interactive Nesting
After setting the parameters of kerf width, cutting margin compensation and Iteration count; You can automatic nest the parts, and then you can reselect this parts, and manually nest objects.
Command:
Menu【Transform > Interactive Nesting】

Steps:
1. Click Menu【Transform > Interactive Nesting】.
2. Set the Parameters: Kerf Width, Clearance, Precision.
3. Select the Stock shape, click Confirm button of Stock.
4.Select the parts, click Confirm button of Part.
5. Set the Parameters of the part. Click OK button, auto nesting the parts.
6. According the nesting results, manually adjust the parts.
7. Press the “Esc” key, exit the operation
Parameters:
Step Setting: Control the Moving Step: and Rotating Step.
Kerf Width: The tool diameter
Clearance: Set remain which is the shortest distance between the original part and part after machining.
Precision: The precision of interactive nesting. The high precision you set, the better effort you will get .but you will spend more time to calculate it.
Part:
X Mirror/Y Mirror: object can be mirrored along x axis or y axis.
Clear: clear selected part. But the outline of part is still left. Select the outline of part and click confirm button, the cleared part can restore.
Rotate 90 deg: rotate part 90 deg, rotation direction is anticlockwise
Keep Top(Tab + ↑): move part to the top of the shape of stock rapidly
Keep Bottom(Tab + ↓): move part to the bottom of the shape of stock rapidly
Keep Left(Tab + ←): move part to the left of the shape of stock rapidly
Keep right(Tab + →): move part to the right of the shape of stock rapidly
Remnant:
Checking “√” before Show remnant boundary, creates theremnant plate and cutting line.
REMARK: When two objects are too near to each other for machining, you will hear a warning from your computer.