
-
Feature
-
Interface
-
File Operation
-
Design Central
-
Basic Setting
-
Viewing Tools
-
Object Operation
-
Drawing
-
Parametric
-
Graph Editing
-
Graph Transform
- Move
- rotate
- Transform Again
- Mirror
- Arc and Line Fit
- Envelop Distortion
- Perspective Distortion
- Push and Pull Distortion
- Twist Distortion
- Shadow Distortion
- Curve Zmap
- Auto Nesting
- Interactive Nesting
- Clone Along a Curve
- Rectangular Clone&Polar Clone
- Clone along a Line
- Clone along an Arc
- Clone along a Spiral
- Scale 2 Points
- Orient 2 lines
- 3D Move
- 3D Rotate
- 3D Scale
- 3D To XY Plane
-
Image Processing
-
Text Editing
-
Node Editing
-
Graph Toolpath
- Tool Path
- Profile Machining
- Area Clearance
- Flute Machining
- 3D Corner Engraving
- Midine Machining
- Drilling
- Insert And Inlay
- Intelligent Machining
- Prism Machining
- Embossing Machining
- Toolpath output
- Tool Management
- Toolpath Walk Simulation
- Toolpath Shaded Simulation
- Post Set
- Toolpath Regenerate
- Toolpath Stat
- Chamfer Machining
- Adaptive Area Clearance
-
Image Toolpath
-
Wireframe Toolpath
-
Toolpath Edit
-
Waveboard
-
Mesh
-
Relief Sculpt
-
Surface
- Surface
- Import Surface File
- Standard Surface
- Freeform Surface
- Chamfer Surface
- Fillet Surface
- Extend Surface
- Show Effect
- To 3D Curve
- Curve Project to Surface
- Pullback
- Extract Edge
- Split at Isocurve
- Trim at Curve
- Trim at Surface
- Untrim
- To Mesh
- Edit Node of Surface
- Insert Control Point
- Vari Fillet Surfaces
- 3D-Spline
- Surface Flatten
- Mesh Wrap
-
Canvas 3D
-
Surface Toolpath
Mask
Mask:
This brush allows you to paint protected areas on your model that will then be immune from editing. This allows you to focus on sections of the sculpt without worrying about accidentally changing things you want to keep.
To mask an area, simply select this brush and paint on the model. Inverse will allow you to modify areas that have already been masked, painting where you want to remove the mask. Short Cut of Mask: Ctrl
Mask Operation:
Holding the CTRL key automatically enables masking without the need to physically click the brush icon.
Mask is valued from 0 — 1.0 ; 0 means no mask.
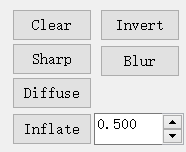
Clear:
Clear off all the mask. or hold [Ctrl], and the mouse double click the blank of mesh;
Invert:Invert the mask region. or hold [Ctrl], and the mouse single click the blank of mesmeh;
Sharp:Make the mask value near to 1.0.
Blur:Make the mask value in neigbor smoother.
Diffuse:diffuse the mask area to neighbor in smoothly .
Inflate:inflate the mask region .